Sharpening images is a basic skill, but often done badly. Too little sharpening and your image will look soft or fuzzy, too much and sharpening artefacts such as halos around detail and edges are prominent. So here are a few notes to assist in understanding what the various sliders in Lightroom’s sharpen tool do.
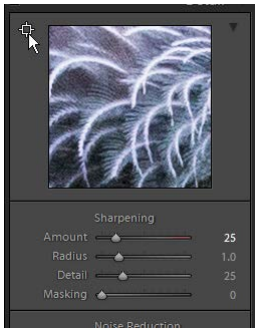 In the Develop module, the sharpening tool has 4 sliders, Amount, Radius, Detail, Masking. Feel free to play with these and investigate the effects on the image. The “square-cross-hair” icon at the top left of the preview area can be clicked to then click on a relevant area of your image to centre the preview on that area. Or, you can move your cursor over the preview image and note that the cursor becomes a hand. Click and drag to reposition the preview of the image. Choose an area of the image where there is some detail that you are interested in being sharpened. It may be, for example, eyes, or, in this example, some feathers with lots of detail. You can see in this image (right) that there the feathers are a little fuzzy. This preview has the default settings of 25 sharpening, 1.0 radius, 25 detail and 0 masking. Some sharpening is normally expected because of the complex procedures needed to translate the pixels in raw images – in the sensor the different colour pixels are different positions and need to be combined – to a rectangular grid of pixels, each with RGB values (for a brief overview try Demosaicing – Wikipedia if you are interested in the technical details).
Read more “Notes on sharpening in Lightroom”