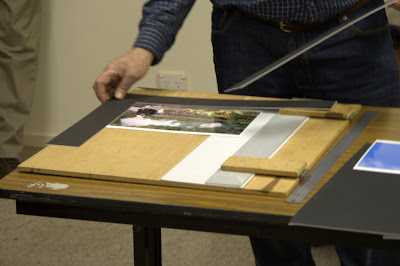
This is the instructions kindly documented by Roger Howell after his very successful picture mounting demo at the club workshop night.
Material & equipment Image mounting demonstration 19th May 2009
Mat Cutter – Logan model 4000 pull type. Fitted with a measurement bar which makes marking out a doddle.
Measurement bar is removed for the cutting operation.
Marking out and cutting board with straight edge – made from a piece of MDF board obtainable from most timber yards. Size not that critical but needs to be around 630 x 530mm. Thickness of 9 mm makes for a lighter structure but probably better if 12 mm is used. This will enable hinges to be attached to the straight edge and holding bar to be attached to the base with small half inch wood screws. (Mine uses glue but it has been known to require repair – see illustration) The straight edge is made from a 50mm strip of clear Perspex obtainable from glass shops who will cut it from an off cut.
High-density cutting mat easily obtainable from most art shops – usually green and marked out in squares.
Stanley Knife for cutting card from large sheets.
Small fine blade scalpel type knife for detaching obstinate corners of cut mounts. A little practice with the Logan mat cutter will avoid this need most of the time.
Steel straight rule 600 mm – best in steel – obtainable from hardware stores.
Magic tape for attaching print to mount.
Double sided tape if mounting full size back boards to mat.
L-plates for sizing image prior to cutting mount board – A pair of these are made from a piece of mount card. They need to be fairly large – large enough to go round your largest print and about 60 mm wide.
Work flow.
Note: – This is the way I did it in the demonstration and using the tools I had. There are other ways but at the end of the day it’s up to the individual as to how he or she tackles the exercise.
- Size the print using L-plates – note inside horizontal and vertical
measurement and decide on border width. It will be found that 60 or 70 mmwill be sufficient but it is a matter of opinion. - Add twice theborder width to each of the horizontal and vertical measurements to determine the size of the mat required.
- Check all measurements and if correct cut mat to correct outside size.
- Set mount cutter measurement bar to border width and mark left and
right hand margin on the back of the mat. - I advised that it was better to displace the image by about 2mm
towards the top of the mat. To do this – set the measurement bar to the border width less 2mm – mark the top border on back of mat and put a ‘T’ on the board to identify the top. Now add 2mm to the bottom width – set the measurement bar accordingly and mark the bottom border.You should now have a correctly sized mat with four boarders marked on the reverse side and the letter T identifying the top of the mat.
That’s the lot.
Roger

