Workshop Night Tuesday June 16th

The June 16 workshop will be a sound triggered flash and still life night.

In one room George Skarbek will set up his sound triggered flash rig and in the other we will attempt to do some table top photography. This means you have to bring some stuff with you on the night… Your camera and tripod for one.

For the sound triggered flash you can bring whatever you like that will make a noise to set the flash off. George is going to bring some balloons to pop with a dart. It wouldn’t hurt to have more balloons on hand so if you have some handy bring them with you. Other things that will work on the night could include breaking a light globe with a hammer, perhaps we could get in close and photograph a match being lit.

I am counting on you to come up with some more, interesting options. What about coating someone’s hands with flour and getting them to clap? There are endless possibilities so please bring any blown light globes you have lying around and anything else you want to have a go at. Please keep in mind that if you want to make a mess you will have to clean it up.
Because we will be smashing glass please bring your sunglasses or another type of eye protection with you. The last thing I want on the night is to have a piece of glass lodge itself in someones eye. It’s unlikely but best to be prepared. I will have a few pairs of safety goggles but not enough to go around.

In the other room we will attempt to do some table top photography. Dave Sumner is going to bring some older style cameras for us to take pictures of. You might have a bunch of flowers or a model train that you would like to shoot.

BRING THEM IN.

It doesn’t matter what it is this is really an exercise in composition and lighting. We also need you to bring some light sources with you. Any kind of light source will do be it a desk lamp or torch or whatever else you can think of. If it needs to be plugged in we will also need you to bring extension cords and powerboards. If you have these things and don’t bring them in then what’s going to happen if everyone else thinks the same as you?

This has all the makings of a really fun (and educational) night but it’s up to us – we’re only going to get out what we put in. See you there.

Berwick Viewfinders Annual Pub National

The President, Pete Davies is looking to find 3 volunteers to judge at the ‘Pub National’ held by Berwick Viewfinders on 9th June 09 at 6.30pm. See below for details:

I am looking for three volunteers from WCC to act as judges at Berwick Viewfinders annual “Pub National”.

What is a Pub National? It is a competition based on a National (such as the upcoming Warragul National) and it’s held at a pub. It’s only open to members of Berwick Viewfinders and it’s meant to be the best of the preceeding 12 months.

What the judges will be required to do is to be at the Central Hotel in lovely Beaconsfield on Tuesday the 9th of June at around 6:30pm. That’s the hard part!

The easy part is to have a meal and a drink (for which BVCC will give you $20) and look at some photos. Couldn’t be more simple.

Because it’s based on a National there will be a panel of three judges who will each award a score from 1 – 5 after being shown the image for 8 seconds.

At the end of the night scores are toted up and some trophies are handed out and everyone goes home with a smile on their face.

If you are interested please contact me asap via email or mobile (0403 803 299)

Knox Photographic Society Monochrome Competition

Just a reminder that our club has been invited to take part in the Knox Interclub competition on Wednesday the 22nd of July 2009.

The competition will be for “Novice Small Prints”, “Large Prints” and “Digital Electronic Projected Images” . It is an OPEN competition, but restricted to MONOCHROME only. Each club may enter 5 in each category.

The judging night will be at Boronia West Primary School, Tormore Road, Boronia. 3155. Melway 64 J8. (Near the Knox swimming pool) starting at 8pm and followed by supper.

All Prints should be mounted. Prints must be identified with a title, Club name and maker.

We will select 5 large prints from those entered in the recent 4-club and VAPS competitions. If you had a monochrome print in one of these competitions, please bring it to our next meeting.

There is a great oppprtunity for members to enter Novice Small Prints (Maximum mount size 8×10 inches – maximum image size 5×7 inches). We will seek interest at our next meeting.

Digital Electronic Projected Images will be selected from entries to our recent EDI competions.

May’s OPEN Competition Results

WCC held its May Competition last night, Tues 5th May 2009.

This was an ‘open’ competition with no set subject. The standard of entries was outstanding, an opinion fully endorsed by the visiting judge, Duane Eaks from the Ivanhoe Photographic Society. Duane said that the standard of images was superb and he was very impressed with all of the entries.

The new format of meeting went really well.

Pete Myers kicked the evening off with an explanatory talk about our blog and gallery. The half time break between judging session was a huge success with a packed house chatting and discussing images etc. In fact the only complaint in the entire evening was that all the milk had been used and there wasn’t much left for Pete to take home.

Three new members joined last night, so a warm Waverley Camera Club welcome goes to Rodelle Keogh, Mary McLean & Natalie McKinna. We also had three “guests” last night all who enjoyed the evening and said they too would look to become members.

Well done to last night’s winners, Pete Myers (B Grade Print), Vicki Moritz (B Grade EDI), Ross Garner (A Grade Print) and Leif Anderson (A Grade EDI).

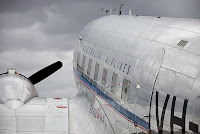
B Grade Print – Better Days – Pete Myers

Pete said “I wanted to try and conjour up an image of this beautiful old plane flying in years gone by. The stormy cloud background and the grey on grey appearance all added to the feel…”.

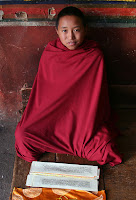
A Grade Print – Trainee Monk – Ross Garner

Ross said, “The picture was taken in Bhutan, which is located between China and India in the Himalayas. Buddhism is the country’s religion and it is auspicious for boys to study in a monastery. This study is rote learning of Buddhist teachings and prayers. The trainee monk was comfortable in having his picture taken (I asked first) and I purposefully didn’t want a toothy smile, but more of a reflective expression. Including the prayers was also important”.

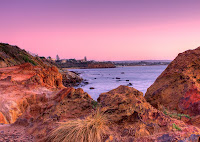
B Grade EDI – Mornington Evening – Vicki Moritz

Vicki said “The image was taken in Mornington, Snapper Point Drive. It was a still mid April evening, so my son and I took off for a costal photo shoot . The image is timed at 7.43, just after dark. 3 exposures given some subtle treatment in Photomatix/Photoshop to bring up the colours in the rocks and sky. I liked the way the rocks framed the view of part of Mornington and provided a bit of foreground interest”.

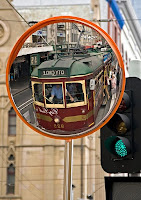
A Grade EDI – In The Mirror – Leif Anderson

Leif said “Print is take in Flinders Street-Swanston Street intersection looking east with St.Pauls Cath. to the left. The Mirror is for the drivers use to see if platform is clear”.

Club Outing to the Botanical Gardens

Below is a report from the President, Pete on last Sunday’s club outing to the Botanical Gardens.

This past Sunday (the 3rd of May) a bunch of intrepid photographers braved the frosty weather and closed freeways to meet in the Melbourne Botanical Gardens. The early morning light was fantastic so some of the crew wandered off to shoot some backlit oak leaves while others took a trek into the fern gully. It was still reasonably dark in the fern gully but there were patches of lovely light streaming through and I managed to get some nice fern fronds brilliantly lit from behind against a dark background. Next up was the lake where initially we shot we shot into the light before moving around to the other side. There was pelican feeding in the lake which we were told is quite a rare occurrence. Unfotrunately it spent most of it’s time with its head under water.

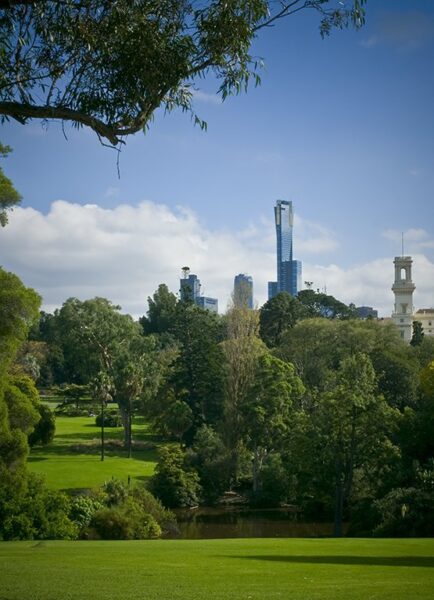
Somehow all the disparate groups all happened to meet up at the cafe where cake and coffee became the order of the day. After that we splintered off again and I slowly made my way back to my car in the company of Anne and two prospective new members – Natalie and Mary, who both happen to be Olympus users. We stopped at a view looking up a hill into the city with Government House and Eureka Tower poking their heads above the trees and it was really fascinating/frustrating to see how two fairly similar cameras could produce very different results.
Despite a fairly chilly start to the day it turned out that it really couldn’t have been much better but I have to say that once again the highlight for me wasn’t where I was but what I was doing and who I was doing it with.

See you at the next one – Montsalvaat on the 7th of June.

Intermediate – Dynamic Range and the Digital SLR

You’ve got a shiny new SLR camera that’s packed with digital sensors and electronic light-gathering instruments and yet you’re somewhat disappointed with the photos it captures.

Why might that be?

One possible reason is because your digital SLR camera does not have the same dynamic range as your eyes do. In fact, limited dynamic range is not just an issue with digital SLR cameras – it’s been an issue with film cameras for years.

Now for the good news, the latest crop of digital SLR cameras is beginning to address the issue of dynamic range, so that the pictures you take are a better match for how your eyes perceive the world.

Shadows, Highlights and Limited Dynamic Range

Every single photo that you take includes shadows and highlights. There are a few basic elements that govern the appearance of shadows and highlights in your photos. Shadows and highlights become more or less apparent depending upon the level of contrast in the scene. The level of contrast is determined by the quality of light. Bright sources of light (bright sunlight, bare bulb flash) create a lot of contrast while muted sources of light (overcast sunlight, diffused flash) generate less contrast.

Light that creates strong contrast is also called hard light while low contrast light is called soft light. Hard light creates dark shadows and very bright highlights while soft light makes the shadows and highlights more balancedWhen you’re looking at a scene where there’s a lot of contrast your eyes are able to see details in both the shadows and highlights.

A digital SLR camera can’t: this is called limited dynamic range. Since an SLR camera can’t capture the entire dynamic range, it has to choose between one of two options:

  • Preserve detail in the shadows and over expose the highlights (making them appear pure white)
  • Preserve detail in the highlights and under expose the shadows (making them appear pure black)

Let’s take a look at the exact same image with each approach applied.

Example 1 – Dark Shadows
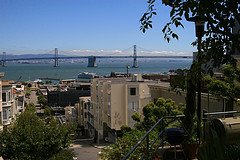
In this case, the camera exposure was set to ensure that detail wouldn’t be lost in the highlights. Since the sky is correctly exposed, the shaded area appears almost pure black and not a lot of detail is apparent in the shadows.

Example 2 – Bright Highlights
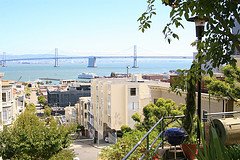
Now the exposure is set to ensure that detail is preserved in the shadows. The leaves on the trees are much brighter, but the nice blue sky looks very pale and washed out. The good news for the computer-savvy out there is that ONE of these problems can be corrected after the fact using image editing software.

Correcting Shadows and Highlights

Many digital images that at first glance appear poorly exposed can often be corrected with image editing software like Adobe Elements. Unfortunately, there’s a catch (assuming that you’re saving photos as JPG files and not RAW).

When detail is lost in shadows it can be recovered, but when detail is lost in highlights it’s gone for good.

Here’s why: when your camera under-exposes the shadows in order to preserve detail in the highlights, it actually does capture detail in the shadows. When the shadows are brightened, this detail becomes apparent.


But when highlights are over exposed and appear as pure white in your photo, the image detail in those areas is LOST. There’s absolutely no way to re-create the detail even if you reduce the intensity of the highlights. This is an important point, because it’s the key to how some digital SLR cameras enhance their dynamic range.

High Dynamic Range (HDR) Photography

One way to address the problem of limited dynamic range is through the use of software: you create an image with extended dynamic range using a computer not a camera. The trick with High Dynamic Range (HDR) photos is that they are really 3 or more photos in one. For any HDR photo, the photographer is blending together more than one image, each with a different exposure.

Let’s use an example with three different source images:

Image# Exposure Detail Preserved
01 Under Exposed Highlights
02 Correctly Exposed Both Highlights and Shadows
03 Over Exposed Shadows

Image two is the baseline image. Image one is used to preserve highlight detail (the sky is blue instead of white) and image three is used to brighten the shadows (they don’t appear as pure black). Using special HDR software, the photographer merges the three photos — this creates a new composite image where details are preserved in BOTH the shadows and the highlights.
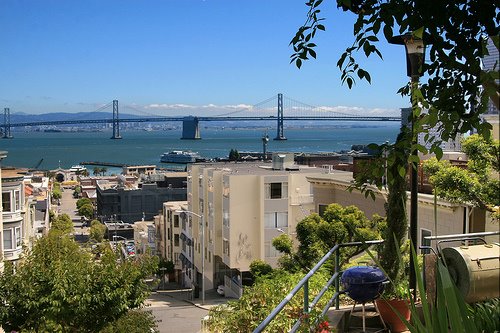
While this is certainly a solution to the limited dynamic range of digital SLR cameras, it’s also labour intensive and requires a fairly high level of computer and software expertise to pull off.
The second solution is one that the camera manufacturers are now building in to the cameras themselves.

Extended Dynamic Range
Wouldn’t it be nice if – rather than spending hours fiddling around with software – your camera could automatically control the brightness levels of shadows and highlights? Now they can. There are several new digital SLR cameras that include enhanced or “extended” dynamic range. I prefer the term “enhanced” myself, since an SLR can’t yet extend its range to be equivalent to an HDR image.

Instead, there are two different “tricks” that digital SLRs can use to improve the appearance of images with extreme contrast:

Make the highlights bright, but prevent them from going to pure white (retain some details)Expose for highlights (making the shadows dark) and then increase the brightness of just the shadows to balance the image.

The first solution is what you’ll find in any Canon digital SLR with enhanced dynamic range – Canon’s terms for it is “highlight tone priority”. When highlight tone priority is active, it does just what’s described for #1 above: it keeps the highlights in check, and preserves some small amount of detail in bright parts of the photo.

Nikon digital SLR cameras have adopted the second solution: it is dubbed “active D-lighting” (don’t you just love these names?). D-lighting is a feature on older Nikon digital SLRs (like the D80) that lets you to increase the shadow brightness of your photos in the camera – editing the image without having to use a computer. Active D-lighting is the same concept, the only difference is that the editing takes place at the time of exposure so you don’t have to fiddle around with your photos later.

Cameras made by Olympus, Pentax and Sony are also starting to include some form of enhanced dynamic range and yes, they ALL have different names for it.

SPECIAL NOTE: before you get all excited about the prospect of a digital camera that can captures exactly what your eyes see, please realize that this technology is in its infancy, and sometimes the effects are quite subtle.

By kind permission of Chris Roberts of http://www.digital-slr-guide.com/
Club Outing – Sunday 3rd May 2009 – Botanical Gardens

Just a quick reminder from the President, Pete Davies regarding Sunday’s club visit to the Botanical Gardens in Melbourne.

This Sunday we are going to Melbourne Botanical Gardens.

I will be at Gate F at 7:30am, yes it’s early.  If you want to get there later and can’t find me hiding in the bushes somewhere then give me a call on 0403 803 299 to find out where I am.  I have to leave at 11 to go to Frankston for a VAPS meeting so I won’t be able to join you for lunch.

If you plan to be there later and stay for lunch then perhaps do a reply all with your plans and mobile number included.  That way we won’t all be completely scattered about the park wandering around looking for someone to explain why their shots are all blurry.

You can find a map of the Botanical Gardens which shows gate F here: http://www.rbg.vic.gov.au/__data/page/1437/GardenMap_2007.pdf

See you there.

Pete

Info – Tuesday Night – 5thMay 2009

Just a quick note from the President regarding the next club meeting and open competition on Tuesday 5th May 2009.

This Tuesday before we get into the competition proper we will be demonstrating how the new online galleries and blogs work. Doors will be open at 7pm and we will be starting this demo shortly after.

ALSO: PLEASE DONT FORGET THAT THE JUNE COMPETITION ENTRIES ARE DUE THIS TUESDAY.

See you then if I don’t see you on Sunday.

Beginner Tutorial – Aperture

I’d like to kick off with one of the more confusing components of any digital SLR camera, aperture. Aperture isn’t even really a feature of the camera: it’s a feature of the lens. It is a measurement of the opening in the lens. This opening allows light to pass through the lens – that light eventually strikes the digital sensor, which then captures an image. The aperture of a lens is never completely closed: it is always either narrow or wide open. Furthermore, aperture is a variable setting that can be adjusted by the photographer.

Back in the good old days of manual film SLR cameras, aperture was always set by turning a ring on the lens (right where it attached to the camera). Today, this mechanical system has been replaced with an electronic one.Many modern digital SLR lenses no longer include an aperture ring. This is because with a digital SLR, you set the aperture using the camera body: electronic contacts allow the camera to communicate with the lens so when you select an aperture on the camera, it adjusts the lens aperture accordingly.

If you do happen to have an older film lens that is compatible with your digital SLR, you will have to lock the aperture ring on the lens (this is often done by turning the ring to the narrowest lens aperture). Once the aperture ring is locked, then the camera will be able to communicate properly with the lens.

Now for the fun part: the aperture numbers themselves. Part of the fun is that in order for them to make sense, you have to think of aperture numbers as fractions, even though they aren’t displayed that way. Here’s why: the larger the aperture number, the smaller the opening in the lens. Aperture numbers follow a pretty typical scale, and you can always tell when an aperture number is being referenced because it starts with “f/”. The aperture scale goes something like this:

f/2.8, f/4.0, f/5.6, f/8, f/11, f/16, f/22

From left to right, the opening in the lens is getting progressively smaller. An aperture of f/2.8 means the lens is wide open, while at f/22 it is quite narrow. This is why thinking about apertures as fractional numbers might help (unless you’re really bad with fractions). For example, if you compared the fractions 1/4 and 1/22, 1/4 is the larger of the two and therefore represents a larger opening of the lens. This is enough aperture numerology for now. In the next post, I’ll tackle the issue of stops of light and will describe how the standard aperture scale can be broken down further.

By kind permission of Chris Roberts of

http://www.digital-slr-guide.com/