Mt Macedon Outing

Sunday the 5th of July was scheduled to be the club outing to Mt Macedon no matter what the weather and the weather was such that only five people braved the cold and slightly damp conditions. Stephen was in shorts (as usual) so it couldn’t have been too cold! The temperature gauge in my car said that it was 3 degrees up at the Memorial Cross, but we also had some welcome patches of sunlight.
First stop of the day was a lake in Macedon and I honestly thought I would be the only one there but Natalie soon rolled up and we went for a stroll around the lake. Fish were jumping out of the water but not in slow motion so neither of us got a shot. We did find an abandoned kids bike in amongst the pines which I found to be an interesting subject.

Next port of call was supposed to be the Forest Glade gardens but it was closed so Nat and I went to a waterfall in Mt Macedon where we caught up with Stephen. This was the first time shooting a waterfall for all of us and while it wasn’t the most spectacular fall it was a good learning experience.

The Memorial Cross was the next stop and as is usual for a camera club trip the view was obscured by clouds. There were large patches of sunlight travelling across the landscape teasing us but nothing came of it except for some frosty noses. It was at the Cross that we caught up with Perry and Rachael and the touring party was complete.

After a hot chocolate in the cafe it was off to Woodend for lunch but along the way we stopped to look at some funky cows (which have a proper name – Belted Galloways) but they were off in the far paddock and the light was pretty dull so we continued on our merry way.
The Victoria Hotel is an extremely popular place for lunch and we hadn’t booked so it was off down the road to Keatings Hotel for lunch. Having warmed up with some good food we ventured out once again and headed off to Hanging Rock. We got there about three and headed on up the hill stopping at several places to take some photos. Naturally the sun hid behind some clouds when we got out of the cars and didn’t come out again until we had descended but we were rewarded with a very nice rainbow at the end of the day.

Driving back back to Mt Macedon we had to pull over to try and take advantage of some of the most intense late afternoon light I’ve ever seen. We had about three minutes before it was gone but it was good to see. We drove back past the paddocks where the funky cows were and they were all up on the fence close enough to touch but by this time it was practically dark so they will have to wait for another time. I doubt I’ll be able to retire on the strength of the images I took on this trip but that was hardly the point. Yet again I thoroughly enjoyed myself due to the people I was with and I’m already looking forward to the next outing.

Pete

Homework For The Beginners Class

Homework for the July beginners class is as follows:

Dig out the manual for your camera and look up the section on white balance and how to change it. Most cameras won’t allow you to change the white balance whilst in automatic mode so if you need to put your camera on to another setting that is quite okay. Nearly all models of camera have a setting very similar to automatic – on a Canon it’s called Program – which will allow you to change the white balance but still work out the exposure and aperture settings for you.

Make sure that if you take it off automatic that you are still shooting jpeg rather than RAW.
Once you have studied the manual and can change the white balance I want you to pick one subject and photograph it using every preset white balance setting available to you. By preset I mean daylight, cloudy, flourescent etc.. Do not concern yourselves with custom settings at this stage.

You will need to set your camera up on a tripod and shoot all your shots as quickly as possible.
Try to do this at a time when the light isn’t fluctuating. For this to work you need to have your subject lit the same way in each shot. Put all your knowledge of composition and lighting to good use and try to produce the best shots you can.

Once you have taken all your shots with each white balance setting go through them and select the one you like best and the one you like least. Resize them so that they are no wider than 1024 pixels and no higher than 768 pixels. Name the files correctly, and for the title put the name of the white balance setting used and wether it’s the best or worst.

For example my best shot could be: WCCA-0907-14A-Tungsten best
Send the two files to: homework@waverleycameraclub.org by 7pm on Monday the 27th of July.

Now here comes the bit where I make it harder, after all it’s more fun when I’m nasty.

THE SUBJECT YOU CHOOSE TO PHOTOGRAPH MUST BE PREDOMINANTLY WHITE.

Enjoy!

Plea For B&W Images for the KNOX Competition

Hi Guys,

We are in urgent need of some small prints for the Know B&W comp. We have to have the entries in to them by Tuesday 7th July 2009 and so far we have NONE.

Being a B&W comp the prints have to be monochrome. The image can be no larger than 5×7 inches. They must be matted and the matt can not be larger than 8×10. If you have anything we can enter (and I know some of you do) please deliver it to Albert Hutchison by Sunday night.

His address and telephone number is in the email sent to you all. The small print section of the Knox B&W is aimed at B graders so please don’t be thinking that you don’thave anything good enough to enter. If matting is the problem then ring me on the number supplied in the email and I will arrange to get the print from you and get it matted.

Pete Davies

Macedon Outing

Outing on Sunday the 5th of July.

The outing this month is to Mt Macedon and surrounds. There is a wealth of fantastic locations in the area and we will struggle to get through even a few of them. There will be a number of meeting points throughout the day so you can turn up whenever suits you best.

The first is in Macedon (not Mt Macedon) at a lake that doesn’t have a name. We’ll meet there at 8:30am. To get there take the Calder Highway towards Bendigo. Get off at the Macedon exit and turn left onto Black Forest Drive and head towards Woodend. Turn right into Nursery which isn’t all that far past the Black Forest Motel. Head towards Macedon on Nursery until you see the Nursery on the left. Just past the nursery you will see a railway bridge going over the road, the lake is on the left before you go under the bridge. It’s not sign posted but it’s hard not to miss.

Next stop will be the Forest Glade Gardens in Mt. Macedon. We will meet there at 10:00am and it’s a $6 donation to get in. It is on the road from Mt Macedon over the top to Woodend. It’s on the right hand side of the road roughly three kilometres from the antique store with the red petrol pump out the front. The antique store is on the left as you travel to Woodend. Parking for the gardens is on the side of the road.

Next stop as we make our way to Woodend is the Memorial Cross. We will be at the Cross at MIDDAY. Parking is free at the Cross which is easy to find as it is well sign posted.

Woodend is the next port of call where lunch will be had at the Victoria Hotel at 1:15pm. The Victoria Hotel is the white pub on the left hand side of the road as you head north.

From the pub we will head off to Hanging Rock for the rest of the afternoon. As it’s $10 per car to leave Hanging Rock (entry is free) it might be a good idea to carpool from Woodend if indeed you aren’t already carpooling.

We will leave for Hanging Rock from Woodend at 2:45pm. The picnic area at Hanging Rock closes at 5pm (I think) at which time everybody heads home having had a splendid day out.
As usual you can call me if you want to know where to find us.
See you there,

Pete

Upcoming competition

The subject for the next competition is: Still Life/Table Top.

This means that all your entries must be either a Still Life or a Table Top setup.

A still life is something that you have set up yourself. Just like the old still life paintings the subject can be whatever you choose. It could be a vase of flowers, a bunch of shells, a bottle of wine or anything else that takes your fancy. The object is for you to come up with a pleasing composition with however many subjects you put in your picture.

Table top photography is much the same as still life but encompasses more. The shots taken at the sound triggered flash workshop would qualify as table top. Be aware that if everyone enters a shot of a balloon bursting it could make for a very repetitive judging.

ADOBE LightRoom 2.4 Update

Adobe have released an update for LightRoom 2 which changes the version to V2.4

Enhancements include:

• Additional camera support for several new camera models including the Nikon D5000 and Canon EOS 500D (Digital Rebel T1i)
• Several corrections for issues introduced by previous Lightroom 2 releases
• Web galleries with a Collection Title of six characters would not export or upload
• The crop aspect ratio could revert to the last selected ratio even when reset to original
• The crop aspect ratio in Quick Develop could be lost after a crop adjustment
• The crop aspect ratio lock could be lost after an orientation switch
• Images could preview incorrectly when imported using the MTP/PTP USB protocol
• Sony .ARW files may not have been recognized by Lightroom’s import dialog
• The Japanese language configuration of Lightroom on Mac OS X 10.5 could fail to switch to the print module if the HP B9180 was set as the default printer
• Metadata options that are intended for use were dimmed incorrectly when exporting DNG files
• The Japanese language configuration of Lightroom on Mac OS X was missing a shortcut for “Zoom Out”
• Several translation and shortcut corrections were made for the eight additional languages introduced with Lightroom 2.3

You can find the Adobe updates here http://www.adobe.com/support/downloads/new.jsp

Photo Note – Compressing for Emailing

The following text was kindly provided by Fred to assist members with the delicate task of emailing images correctly. Fred has put a lot of time and effort into this document and it would be nice to show appreciation next time you see him.

Terms used in the post are:
MB = Megabyte
KB = Kilobyte
JPEG = Joint Experts Photographic Group (.jpg extention on picture file names)

Preface for Waverley Camera Club I wrote these notes for the photographers in the bushwalking club, most of whom do not use software such as Photoshop. Unfortunately their emailed photos were often reduced to postcard size and quality, and occasionally were inconveniently large. Some were not attached to the email, but were embedded in it and were difficult to extract for use in a slideshow. Most contributors, even the experienced photographers, were unaware of the problems in their contributions.

I have revised the notes for placing on the WCC blog, because the EDI Steward is encountering similar problems in some of our contributions. If your projected images don’t look sharp or don’t fit the screen, please read on.

Fred Bullock, 23 June 09.

Introduction
Email is a handy vehicle for sending photos. Problems are unlikely if you use a tool like Photoshop to resize your pictures for emailing and then use the email application’s own attachment tool to attach it.

Unfortunately, many photos are spoiled by the obscure settings of other photo and email tools, usually by excessive resizing down to postcard or thumbnail size, which destroys detail, sharpness and quality. Also some settings embed the photos into the email’s body making them difficult to extract and save in a slideshow etc.

These problems are not apparent to the sender, only the recipient is aware unless the sender is aware of them. To check this, note the file size of the photo’s .jpg icon which is actually in the email’s attachments header, and double-click on it to inspect the picture (ignore any picture showing in the body of your email). If the photo’s icon is not in the attachments header, or if the file size is too large, or if it opens as a small or blurry or blotchy picture, please read on.
Sometimes re-compression is not done until the email is saved or sent (eg compressing within MS Outlook), so also check the email when it is in the Draft folder, Outbox or Sent Items folder. (If you open an email which is in Outlook’s outbox, you may have to click ‘Send’ again, otherwise it will not be sent even when you click Send All).

Please continue to use the highest quality settings on your cameras so you can tweak your photos and still get high quality large prints occasionally. The photos are usually lightly compressed by the camera, to about 5 MB depending on the camera. However it’s easier to email photos if they are re-compressed so that sufficient quality is retained. They transmit faster and there is reduced congestion in the recipients’ mailboxes.

The settings for the email tools are usually adjustable, but often hidden. The settings described in this note yield photos fit for projection, yet they have about 200 to 400 kByte file size and are fairly easily emailed.

General guidelines and guidelines for some Windows email tools and popular photo software are shown below. Moderate PC skills are assumed. The descriptions are cryptic, so it is best to follow those for your chosen compression tool while you operate it. The exact procedures may differ because of software upgrades or individual PC configuration.

General guidelines A typical 10 Megapixel camera takes and stores images about 3900 x 2600 pixels in size, compressed with the JPEG algorithm from 30 MB to about 5 MB. JPEG is the Joint Photographic Experts Group of the International Standards Organization, and computers use the .jpg suffix for the files.

Most resizing tools provide a combination of resampling and JPEG re-compression. The JPEG re-compression control is often just labelled “quality”. JPEG needs more processing power than resizing, but usually yields superior quality for the same file size.

The data projector resolution (what it shows on the screen) is width 1024 pixels x height 768 pixels. So, first set the resize control to fit a 1024 x 768 window.

Then set the JPEG compression quality to produce a compressed file size of about 200 to 400 KB. Unlike resizing, JPEG compression does not reduce the image size (pixels) and largely retains the sharpness remaining after the resizing step. (If used excessively it causes randomly blotchy tones, or ripples at hard edges, and in extreme cases its 8×8 blocks of pixels become visible).

Unfortunately different tools have different descriptions of each level of JPEG compression (quality). Some tools show an estimated file size before doing the processing, but this can be very inaccurate. So a little trial and error may be needed – start again with your originals, not with the incorrectly compressed photos.

The email commands in some photo programs may not work with some email applications, sometimes merely because the default email setting of the computer and the application are inconsistent. Otherwise there is usually an edit or export command that can be used instead.
With all exporting or editing tools, take care not to overwrite your original photos.
Some Useful Photo Tools

Windows XP, Send To > Mail Recipient command
This is a simple and widespread tool, best used as follows. Right-click on the selected photo file icon(s) and select Send To > and ‘Mail Recipient’ in the cascaded menus that appear. Then in the dialog box that appears, click Show more options… and click the ‘Make all my pictures smaller and the ‘Large’ (fits in a 1024 by 768 window) buttons. The JPEG compression quality is not adjustable. Click OK to create the email.

Windows Vista, Send To > Mail Recipient command
Right-click on the selected photo file icon(s) and select Send To > and Mail Recipient in the cascaded menus that appear. Then in the dialog box that appears, select Picture size: Medium: 1024 x 768. The JPEG compression quality is not adjustable. Click Attach to create the email. Beware that the Vista version of this application generates noticable fringing of some fine patterns, eg in photographs of feathers, but it is OK for general photography.

Picasa (a freeware photo manager, owned by Google)
Picasa fits horizontally oriented photos correctly to XGA resolution (WxH 1024×768) but incorrectly fits vertically oriented photos to WxH 768×1024, which is larger than required and these will be resampled by the club’s PC.Picasa’s Email button must be set up before use. The email settings are stored in its Tools menu, Options dialog box, Email tab. Choose which email client is to be used. Set the resize slider full right (1024 pixels) and click the 1024 pixels button just below it. The JPEG compression quality is not adjustable. Make sure the Send as HTML storybook button is not ticked because it embeds the photos. Click OK to store the settings.

Then select some photos and click the Email button to create an email. Use the Export button if the email button doesn’t work with your email application or if you want more options. Select some photos and click Export. In the dialog, browse to a temporary export location, click Resize to and set to 1024 pixels, set Image Quality to Normal or to Minimum. Click OK to export the compressed photos. Attach the exported photos in your email application.

Microsoft Outlook (comes with MS Office Professional)
(This paragraph was contributed by an Outlook user.) Create a new message and attach your photos with Insert, File command or the paperclip button (do not use Insert, Picture because that command embeds the photo in the mail message). Then click on the Attachment Options button next to the attachment line and select under Picture Options the picture size Large (1024 x 768 px) from the drop-down menu.

The JPEG compression quality is not adjustable. The file size of the attached photos does not change at this stage, the smaller file size will be apparent only after saving to the Drafts folder or having pressed the Send button (look in your Sent Items folder or in the Outbox if the actual transmission is still pending). If the Attachment Options button does not show, use the Options command to get it.

Microsoft Outlook Express
The Insert, File function is not available in Outlook Express, the lightweight version of Microsoft Outlook. Re-compress using a photo editing application and then attach the saved re-compressed photos with Outlook’s Insert, File Attachment command or the Attach (paperclip) button. Or use the Windows Send To > Mail Recipient command (see above), or the email command of a photo application.

Photoshop Elements
Open the picture and do the required cropping and editing (levels adjustments etc) before downsampling it.

Crop without resampling by selecting the crop tool and clicking the Clear button in its options bar, then do the cropping. To constrain the crop shape (eg to the projector shape) set suitably proportioned and easily remembered dimensions like 1024 cm x 768 cm and clear the Resolution box. The units of size (cm, inches etc) do not matter for projection, but do not set dimensions in pixels (eg 1024 px x 768 px), because that will invoke downsampling before you have done the editing.

To resample an image (after editing it), in the Image menu choose Resize > Image Size. In the dialog box, select Resample Image and choose Bicubic interpolation (and the options of superior interpolating filters or some sharpening may be available in later versions of PSE). Select Constrain Proportions . In Pixel Dimensions, enter values for width or height, choose pixels as the unit of measurement. Depending on the shape of your picture, set W = 1024 and check that H is 768 or less, or set H = 768 and check that W is 1024 or less. Click OK. The image will be shown as a smaller size on screen. Zoom in to check the quality. Some sharpening may improve the quality.

Save As a new file using the competition format for the filename. Select the JPEG format and tick ICC Profile. Click Save and in the next window select Medium or High quality and Baseline (Standard) format. Tick Preview to see an estimate of the file size, adjust the quality to change the size if required. Click OK.

Attach the picture(s) from within your email application. Or use Photoshop’s File menu, attach to E-mail command which creates an email and attaches the current picture.

Irfanview
This is freeware, quite handy for slideshows and image file manipulations.

Open the picture and in the Image menu select Resize/Resample… , and in the dialog box select or tick Set new size, pixels, Preserve aspect ratio, and Resample, and in the Resample filter box select the Lanczoss filter. Depending on the shape of your picture, set Width = 1024 and check Height is 768 or less, or set Height = 768 and check Width is 1024 or less). Selecting Apply sharpen after Resample may give a better looking result. Click OK. Then Save as a new file using the competition format for the filename. In the Save Picture As … dialog box, tick the Show options dialog button to get more control, importantly it is possible to set the JPEG quality, eg to 90%. Check the file size and image quality after saving.

Other photo software
Please discuss it with us.

Software to avoid
Microsoft Office Picture Manager (comes with MS Office) Be very wary with this application. When its edit tool is used for compression, it easily overwrites your originals even after you have saved the edited images under a new filename – always copy your originals before using this application and work only with the copies. Also, the edit tool or Picture button produce noticable fringing of fine detail (eg coarse ripples in photos of feathers) There is little reason to use this application unless you want to edit your pictures – and there are alternatives for that.

However MS Vista users who have problems with fringing of fine patterns when using the Send To > Mail Recipient command may find this application solves the problem, but Picasa is much easier and safer to use for equivalent results.

Microsoft Picture It! (a lightweight photo editor that came with MS Works) Avoid this tool entirely because it produces coarse and ugly fringing and blotchiness of fine detail (eg very coarse ripples in photos of feathers).

Fred Bullock

Ake’s Trip Through the Outback

Ake Severinson has sent me an email and asked that I consider publishing his Flikr web page details for his recent trip in the Outback. Well I think it would be fantastic to share Ake’s trip and recommend that you go and have a look at his site. Thanks Ake for sending and sharing these details with us.

I haven’t contributed much to the competitions and such. Have been busy sharing my Australian experiences with family and friends. I post stuff on Flickr from time to time for them. My latest set was from a recent trip I did through the Outback. Thought I’d share it with you as well:

Ake’s FLIKR page

Ake

Workshop Night is a HUGE Success

Last night’s (Tue 16th Jun) workshop night was a huge success with approx 39 members and guests attending. Many people commented on how they enjoyed George’s sound triggered flash setup. There was also a still life table which attracted several photographers, beginners and experienced alike. I think that all who participated would join with me in thanking George Skarbek for his efforts and help with what was a great club workshop evening.

Sound Triggered Flash Workshop

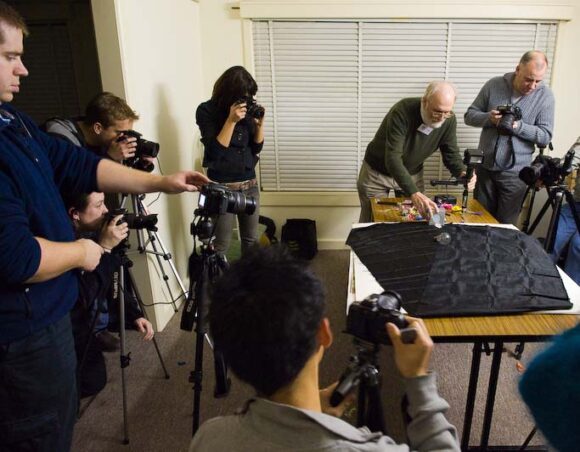
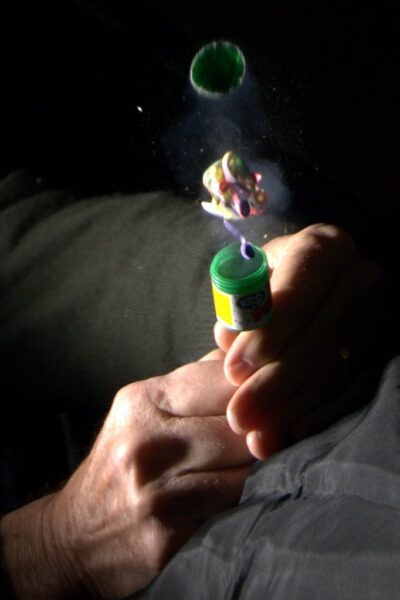
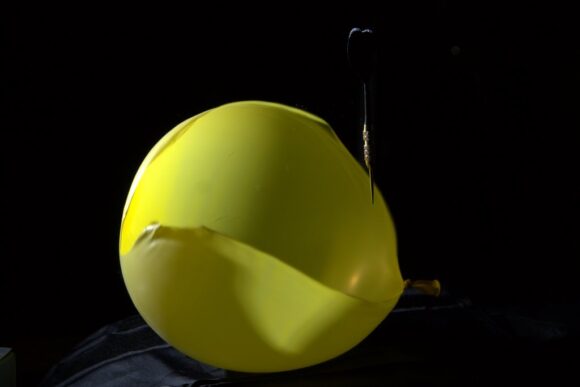
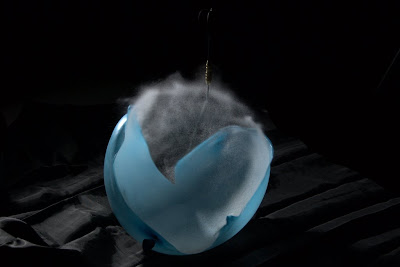
By far the main event was the sound triggered flash help upstairs in Wadham House. Thanks to George who brought in his equipment, members were able to photograph balloons full of flour bursting, light globes being smashed and party poppers being fired.

The basic idea was that around 8 photographers would setup their cameras, hand held or on a tripod, at F/5.6, ISO200 and 4″ exposure. Everyone then obtains a good focus whether manually or auto (Nikons were a pain due to there auto focus assist lamps), the light is then extinguished and the shutters are pressed. After 1 second, george would carry out his action whether it be dropping a dart on a balloon or hitting a light globe with a small hammer. The sound of the balloon popping or hammer hitting glass would then trigger the flash and the exposure was taken. The light monitor person would then count to 3 in their head and put the light back on and in the meantime the shutters set at 4 seconds would have closed and we all would admire the images that we had taken.

Adjusting the time when the flash fires was done by simply moving the sensor back and forward and George advised that 10cm of movement would change the time by 1,000th of a second. Many people commented to me on how they really enjoyed the night and a good number took away plans provided by George to attempt to build their own systems.

A group setting up with George getting ready to smash a light globe

George releasing a party popper.

Balloon ripping apart after being punctured by a dart.

The same as above but with flour in the balloon.

Images by David Burton

Still Life Workshop

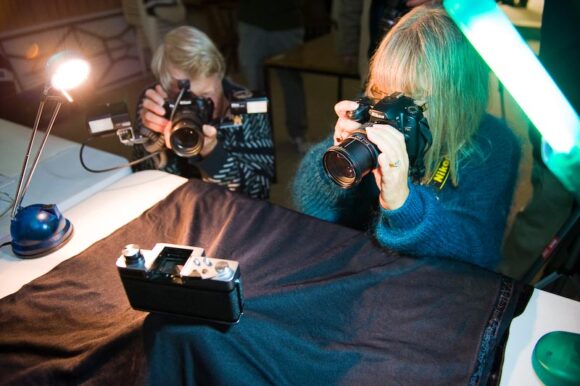
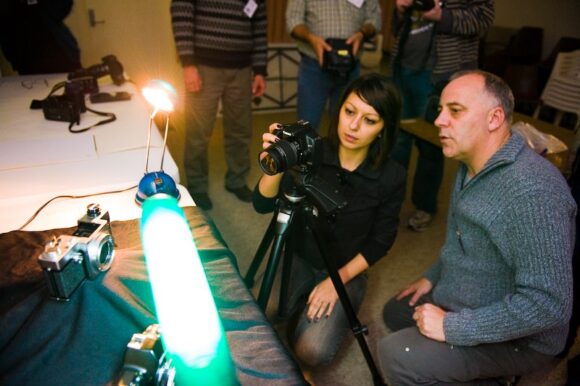
Downstairs saw a still life workshop and this definitely played second best to the sound triggered flash running upstairs. However, because of the limited space upstairs, the still life gave an alternative whilst we waited for our turn. It nearly didn’t get off the ground because although people were asked to bring in things to use as still life subjects, only Pete Davies and I remembered and fortunately we had several items to use.

Anne and Fred at the still life table

(Fred is about to give the wall a sun tan with his flash setup)

Pete Myers instructing a new member, Diana on the aspects of table top photography

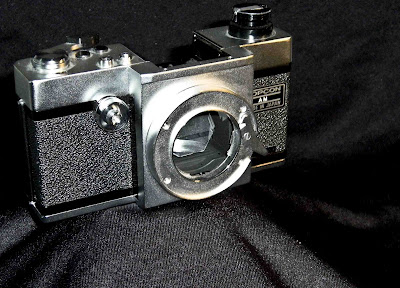
Thankfully, the Pete had also brought in a couple of lamps and a black back cloth so the still life session managed to go ahead. Several people had a go at this and many found that the particular setup was suited to B&W and I saw some great attempts including this one taken by Rosie Armitage. Rosie is new to the club and is in the beginners class, she took the shot with her pocket camera and it came out very well.

Well done to Rosie for getting in there and having a go whilst the others were just stood around talking about it.

Still Life taken by Rosie Armitage using her pocket Fuji digital camera

Thanks to all who attended the night and made it a huge success especially to George for bringing and operating his equipment. Thanks also to all who helped organise the night.

Photographs by Rosie Armitage and Teddy Tan

Image Mounting Demo – 19th May 2009

This is the instructions kindly documented by Roger Howell after his very successful picture mounting demo at the club workshop night.

Material & equipment Image mounting demonstration 19th May 2009

Mat Cutter – Logan model 4000 pull type. Fitted with a measurement bar which makes marking out a doddle.
Measurement bar is removed for the cutting operation.

Marking out and cutting board with straight edge – made from a piece of MDF board obtainable from most timber yards. Size not that critical but needs to be around 630 x 530mm. Thickness of 9 mm makes for a lighter structure but probably better if 12 mm is used. This will enable hinges to be attached to the straight edge and holding bar to be attached to the base with small half inch wood screws. (Mine uses glue but it has been known to require repair – see illustration) The straight edge is made from a 50mm strip of clear Perspex obtainable from glass shops who will cut it from an off cut.

High-density cutting mat easily obtainable from most art shops – usually green and marked out in squares.

Stanley Knife for cutting card from large sheets.

Small fine blade scalpel type knife for detaching obstinate corners of cut mounts. A little practice with the Logan mat cutter will avoid this need most of the time.

Steel straight rule 600 mm – best in steel – obtainable from hardware stores.

Magic tape for attaching print to mount.

Double sided tape if mounting full size back boards to mat.

L-plates for sizing image prior to cutting mount board – A pair of these are made from a piece of mount card. They need to be fairly large – large enough to go round your largest print and about 60 mm wide.

Work flow.

Note: – This is the way I did it in the demonstration and using the tools I had. There are other ways but at the end of the day it’s up to the individual as to how he or she tackles the exercise.

  1. Size the print using L-plates – note inside horizontal and vertical
    measurement and decide on border width. It will be found that 60 or 70 mmwill be sufficient but it is a matter of opinion.
  2. Add twice theborder width to each of the horizontal and vertical measurements to determine the size of the mat required.
  3. Check all measurements and if correct cut mat to correct outside size.
  4. Set mount cutter measurement bar to border width and mark left and
    right hand margin on the back of the mat.
  5. I advised that it was better to displace the image by about 2mm
    towards the top of the mat. To do this – set the measurement bar to the border width less 2mm – mark the top border on back of mat and put a ‘T’ on the board to identify the top. Now add 2mm to the bottom width – set the measurement bar accordingly and mark the bottom border.

    You should now have a correctly sized mat with four boarders marked on the reverse side and the letter T identifying the top of the mat.

That’s the lot.

Roger